Exploring Zig by Building and Plotting the Mandelbrot Set
Getting familiar with the Zig programming language by implementing and visualizing the Mandelbrot Set from scratch.
Table of Contents
Zig is a general-purpose, statically typed, compiled system programming language designed by Andrew Kelley back in 2016. It aims to succeed C by being simpler and smaller, yet more functional, making it an appealing choice for system-level programming.
The Mandelbrot set, on the other hand, is a complex fractal shape. It consists of points in the complex plane that remain within certain limits under repeated application of a simple mathematical formula.

The idea for this post came after reading Programming Rust: Fast, Safe Systems Development by Jim Blandy, Jason Orendorff, and Leonora Tindall, which included a Mandelbrot implementation in Rust. I liked the concept and thought it would be a fun way to explore Zig by building something visual and interactive. So here we are.
Let’s explore Zig by building a program that plots the Mandelbrot set, as shown in the figure above. The task involves parsing command-line arguments, iterating over image pixels, coloring pixels based on their inclusion in the Mandelbrot set, writing the results into a PNG file, and enhancing rendering performance by leveraging Zig’s concurrency capabilities.
Installing Zig
You can install Zig using Homebrew as follows:
$ brew install zig

$ zig version
0.12.0
For non-Mac users, visit the official Zig GitHub page: Install Zig from a Package Manager .
There’s a VS Code extension available for Zig. It supports syntax highlighting and auto-compilation but requires the Zig language server, which can be installed as follows:
brew install zlsFor alternative Zig tools and utilities, visit the official Zig Tools resource .
Creating a new project with ZIG INIT
Before starting your project, it’s a good idea to familiarize yourself with what Zig has to offer. Run the following command to see a list of available options:
zig -hTo create a basic project structure, use the init command. Here’s how to set up a new project named mandelbrot:
mkdir mandelbrot
cd mandelbrot
zig init
This will generate several files:
build.zig: A build script that declaratively constructs a build graph.build.zig.zon: Contains project metadata and a list of external dependencies.src/main.zig: The entry point of your project, initially filled with someHello Worldcode.src/root.zig: An example of a static library included in the build script for demonstration.
To build, test, and run your new project, execute:
zig build test run --summary allHere’s what you should expect:
- Build Process: Zig compiles and links your code, reporting progress and success.
- Test Outputs: Displays results for each test, including execution time and resource usage.
- Run Outputs: Shows the execution time and memory usage for the running application.
You should see messages indicating that all steps have succeeded, all tests have passed, and your application ran successfully:
All your codebase are belong to us.
Run `zig build test` to run the tests.
Build Summary: 12/12 steps succeeded; 2/2 tests passed
test success
├─ run test 1 passed 234ms MaxRSS:2M
│  └─ zig test Debug native success 950ms MaxRSS:203M
└─ run test 1 passed 351ms MaxRSS:2M
   └─ zig test Debug native success 951ms MaxRSS:224M
run success
└─ run mandelbrot success 120ms MaxRSS:1M
   ├─ zig build-exe mandelbrot Debug native success 950ms MaxRSS:191M
   └─ install success
      ├─ install mandelbrot success
      │  └─ zig build-lib mandelbrot Debug native success 950ms MaxRSS:177M
      └─ install mandelbrot success
         └─ zig build-exe mandelbrot Debug native (reused)
Congrats! You’ve just built and run the basic Zig program. Now let’s dive deeper into the Mandelbrot set and start implementing specific functions.
Implementing the Mandelbrot set
Consider this function to explore the behavior of the sequence:
fn squareAdd(c: f64, n: u32) f64 {
var z: f64 = 0;
for (0..n) |_| {
z = z * z + c;
}
return z;
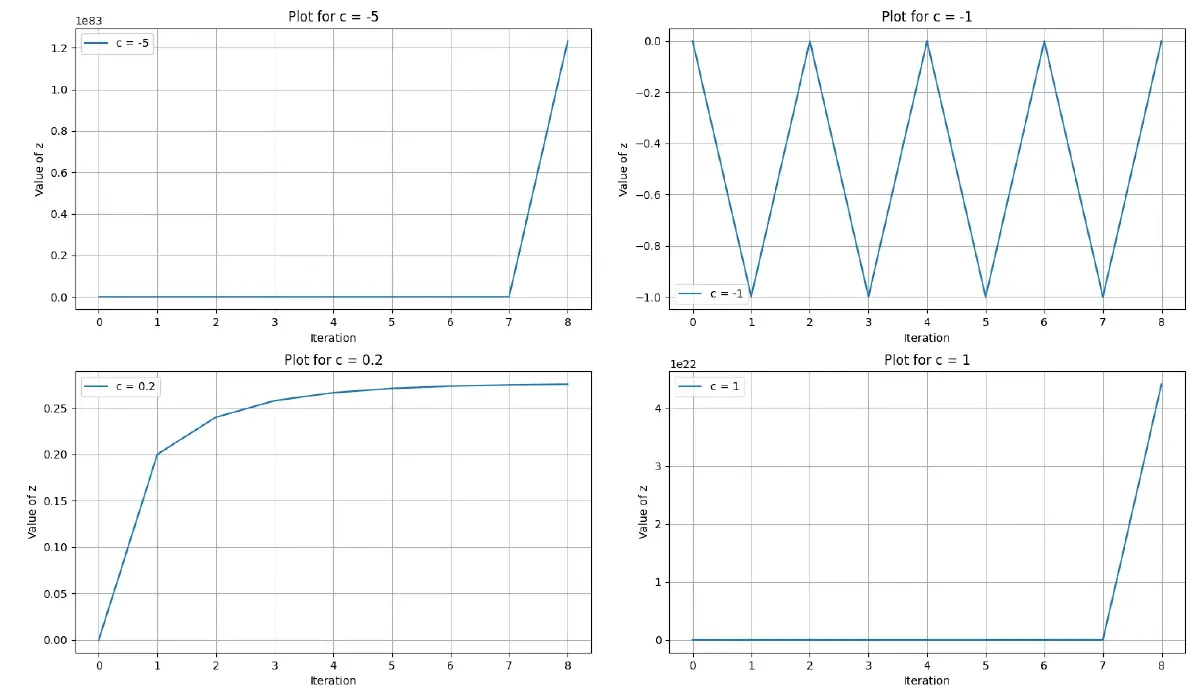
}Here, z starts at zero and updates each iteration by squaring itself and then adding c. Experimentation shows that if c is greater than 0.25 or less than -2.0, then z eventually becomes infinitely large, otherwise, it stays around zero.
If you plot values for different c (e.g., -5, -1, 0.2, 1) with a limit of 8 iterations, you’ll see z’s distribution depending on c values. Those outside the range [-2.0, 0.25] result in a significantly larger z after 8 iterations compared to values within this range, as shown in Figure 2.
To get the actual Mandelbrot set, replace z and c with complex numbers. This shift produces the beautiful patterns of the Mandelbrot set. It is defined by complex numbers c for which the sequence \(z_{n+1} = z_n^2 + c\) remains bounded when iterated from \(z_0=0\).
Building a simple complex number type
Zig doesn’t have a built-in type for complex numbers, so let’s define one. Here’s how you can create a generic type for complex numbers using Zig’s compile-time capabilities:
fn Complex(comptime T: type) type {
    return struct {
        const Self = @This();

        re: T,
        im: T,

        /// Adds two complex numbers
        fn add(self: Self, other: Self) Self {
            return Complex(T){
                .re = self.re + other.re,
                .im = self.im + other.im,
            };
        }

        /// Multiplies two complex numbers
        fn multiply(self: Self, other: Self) Self {
            return Complex(T){
                .re = self.re * other.re - self.im * other.im,
                .im = self.re * other.im + self.im * other.re,
            };
        }

        /// Computes the squared norm of the complex number
        fn normSqr(self: Self) T {
            return self.re * self.re + self.im * self.im;
        }
    };
}
The function returns an anonymous struct representing a complex number. The comptime keyword on a parameter means that the parameter must be known at compile time.
Built-in functions are provided by the compiler and are prefixed with @. @This() returns the innermost struct, enum, or union that this function call is inside. This is useful for an anonymous struct that needs to refer to itself like in the case above.
Zig supports 3 types of comments. Normal comments // are ignored, but doc comments /// (used in the code above) and top-level doc comments //! are used by the compiler to generate the package documentation.
A complex number c has both real (c.re) and imaginary (c.im) components, which can be treated as the x and y coordinates on a Cartesian plane. To visualize the Mandelbrot set, you’re going to color each point based on whether the corresponding complex number belongs to the set. Points in the set are typically colored black, while those not in the set are colored in lighter shades.
Figuring out when a point escapes
Experimental observations show that if a complex number z ever exits the circle of radius 2 centered at the origin, it will inevitably escape to infinity. Based on this, you can determine whether a complex number is part of the Mandelbrot set by tracking its trajectory.
fn escapeTime(c: Complex(f64), limit: usize) ?usize {
    var z = Complex(f64){ .re = 0.0, .im = 0.0 };
    for (0..limit) |i| {
        if (z.normSqr() > 4.0) {
            return i;
        }
        z = z.multiply(z).add(c);
    }
    return null;
}
The function escapeTime calculates how many iterations it takes for a complex number to escape the radius of 2 around the origin, marking it as not part of the Mandelbrot set.
The ?T syntax denotes an optional type, where T can be any type (e.g., ?usize). This means the value can either be of type T or it can be null, indicating the absence of a value.
The for loop syntax for (0..limit) |i| { ... } is a way to iterate over a range of integers from 0 to limit - 1, and capture each integer in i to be used inside the loop.
Adding a few quick tests
The Zig standard library contains functions for testing your code. This is super useful because in languages like Java you bring external dependencies like JUnit to write basic unit tests. Let’s add few tests for the escapeTime function:
test "expect point escapes the Mandelbrot set" {
    const limit = 1000;
    const c = Complex(f64){ .re = 1.0, .im = 1.0 };
    const result = escapeTime(c, limit);
    try std.testing.expect(result != null);
}

test "expect point stays within the Mandelbrot set" {
    const limit = 1000;
    const c = Complex(f64){ .re = 0.0, .im = 0.0 };
    const result = escapeTime(c, limit);
    try std.testing.expect(result == null);
}
The tests check whether points escape or stay within the Mandelbrot set under the iteration limit.
To run these tests, use the command:
zig build test --summary allRendering the Mandelbrot set
Rendering the Mandelbrot set involves translating between two coordinate systems: the pixel coordinates of the output image and the corresponding points on the complex plane. The mapping between these systems is determined by the section of the Mandelbrot set you want to plot and the resolution of the image. These parameters will be specified through command-line arguments.
Mapping pixels to the complex plane
The function below translates pixel coordinates from the image to their corresponding points on the complex plane.
fn pixelToPoint(imgSize: [2]usize, pixel: [2]usize,
    pointTopLeft: Complex(f64), pointBottomRight: Complex(f64)) Complex(f64) {

    const width = pointBottomRight.re - pointTopLeft.re;
    const height = pointTopLeft.im - pointBottomRight.im;
    return Complex(f64){
        // Calculate the real part of the complex number.
        .re = pointTopLeft.re + @as(f64, @floatFromInt(pixel[0])) * width
            / @as(f64, @floatFromInt(imgSize[0])),

        // Calculate the imaginary part of the complex number.
        // Subtract here because in image coordinates, y increases as you go down,
        // but in the complex plane, the imaginary part increases as you go up.
        .im = pointTopLeft.im - @as(f64, @floatFromInt(pixel[1])) * height
            / @as(f64, @floatFromInt(imgSize[1])),
    };
}

test "expect pixel maps to point on the complex plane" {
    const topLeft = Complex(f64){ .re = -1.0, .im = 1.0 };
    const bottomRight = Complex(f64){ .re = 1.0, .im = -1.0 };
    const result = pixelToPoint(.{ 100, 200 }, .{ 25, 175 }, topLeft, bottomRight);
    try std.testing.expectEqual(Complex(f64){ .re = -0.5, .im = -0.75 }, result);
}
In the test above, given an image of 100x200 pixels and a complex plane area from -1.0, 1.0 to 1.0, -1.0, the pixel 25, 175 should map to the complex number -0.5, -0.75.
Plotting each point based on escape time
To visualize the Mandelbrot set, each pixel’s corresponding point on the complex plane is evaluated using the escapeTime function. The color of each pixel is then determined by how quickly the point escapes to infinity. Points that are part of the Mandelbrot set are colored black, while those that escape are shaded darker the longer they take to escape.
Here’s how you can render a section of the Mandelbrot set into a buffer of pixels, where each pixel’s grayscale value represents how quickly points escape:
fn render(pixels: []u8, imgSize: [2]usize, pointTopLeft: Complex(f64),
    pointBottomRight: Complex(f64)) void {

    for (0..imgSize[1]) |row| {
        for (0..imgSize[0]) |col| {
            const point = pixelToPoint(imgSize, .{ col, row },
                pointTopLeft, pointBottomRight);
            const escapeCount = escapeTime(point, 255);

            pixels[row * imgSize[0] + col] = switch (escapeCount) {
                null => 0,
                else => 255 - escapeCount.?,
            };
        }
    }
}
[]u8 denotes a slice of unsigned 8-bit integers. In the context of the render function, this slice represents the buffer holding the grayscale pixel values for the image, where each pixel is one byte.
The .? operator is used to get the value inside an optional type and ensure that it is not null. If the value is null, the program will raise an error.
The switch statement is used for pattern matching. It evaluates an expression and executes the code associated with the matching pattern. However, Zig
doesn’t support optionals as a switch expression
. Even worse, you get a runtime error when trying to run the program which executes the logic with the above switch block:
run
└─ run mandelbrot
   └─ install
      └─ install mandelbrot
         └─ zig build-exe mandelbrot Debug native 1 errors
src/main.zig:240:54: error: switch on type '?usize'
            pixels[row * imgSize[0] + col] = switch (escapeCount) {
                                                     ^~~~~~~~~~~
Looks like the rationale behind this is that when you handle optionals you have only two cases which can be handled with if-else. Thus, Zig developers refused to complicate the switch.
To fix the error replace the switch block with an if statement that captures the value count from the optional:
pixels[row * imgSize[0] + col] =
    if (escapeCount) |count| 255 - @as(u8, @intCast(count))
    else 0;
Writing the output as a PNG image
It’s time to explore how to use external dependencies in Zig. Zig provides a build system that can be leveraged to manage these dependencies.
I found Zigimg library , which supports reading and writing various image formats. Let’s use it to save the Mandelbrot set as a PNG image.
First, integrate Zigimg into your project by cloning the repository into your project root:
git clone git@github.com:zigimg/zigimg.gitThen, update build.zig file to include the Zigimg module just before installing the main artifact b.installArtifact(exe); line:
exe.root_module.addImport("zigimg", b.createModule(.{
    .root_source_file = .{
        .path = "zigimg/zigimg.zig"
    }
}));

b.installArtifact(exe);
Update src/main.zig file to import Zigimg:
const zigimg = @import("zigimg");Now you’re ready to write the PNG image. Here’s a function which does this:
fn writeImage(filename: []const u8, pixels: []const u8,
    imgSize: [2]usize) !void {

    const width = imgSize[0];
    const height = imgSize[1];
    const allocator = std.heap.page_allocator;

    // Initialize image object with given pixel data and configuration.
    const pixelStorage = try zigimg.color.PixelStorage.init(
        allocator, zigimg.PixelFormat.grayscale8, width * height
    );

    for (pixels, 0..) |pixel, index| {
        pixelStorage.grayscale8[index] =
            zigimg.color.Grayscale8{ .value = pixel };
    }

    var image = zigimg.Image{
        .allocator = allocator,
        .width = width,
        .height = height,
        .pixels = pixelStorage,
    };

    defer image.deinit();

    try image.writeToFilePath(filename, zigimg.Image.EncoderOptions{
        .png = .{},
    });
}
Zig doesn’t have garbage collection or automatic runtime memory management. Instead, memory is managed explicitly using allocators, which handle memory allocation and deallocation. This allows for choosing the appropriate memory management strategy for the context, such as using std.heap.page_allocator for general-purpose allocations.
In Zig, errors are treated as values. An error set is similar to an enum, where each possible error is a distinct value. Functions can return an error union type, indicated by the ! operator, which combines an error set with another type. For example, !void in a function signature means the function could fail with an error but does not return a value.
The try keyword is used to handle expressions that might return an error. It automatically propagates the error up the call stack if one occurs, or continues execution normally if no error arises.
The defer keyword postpones the execution of a statement until the block exits, regardless of how the exit occurs. This is useful for ensuring resources are cleaned up. The errdefer variant specifically runs its deferred action only if exiting the block due to an error.
Parsing command-line arguments
To make the Mandelbrot set rendering more flexible, you’ll want to dynamically specify the image size and the section of the Mandelbrot set to be visualized. To achieve this, let’s create a function to parse command-line arguments that determine the resolution of the image and the portion of the Mandelbrot set the image will display.
fn parseArg(comptime T: type, str: []const u8, separator: u8) ?[2]T {
    if (str.len == 0) return null;

    const index = std.mem.indexOfScalar(u8, str, separator);

    if (index) |i| {
        const leftStr = str[0..i];
        const rightStr = str[i + 1 ..];

        const left = parseT(T, leftStr) catch return null;
        const right = parseT(T, rightStr) catch return null;

        return [2]T{ left, right };
    } else return null;
}
Making the parseArg function generic for any type T is challenging in Zig because it lacks runtime reflection and dynamic type interpretation common in more dynamically-typed languages. To parse different types effectively, you’ll need to explicitly handle each type’s parsing logic:
fn parseT(comptime T: type, str: []const u8) !T {
    switch (T) {
        f32, f64 => {
            return std.fmt.parseFloat(T, str);
        },
        i32, i64, usize => {
            return std.fmt.parseInt(T, str, 10);
        },
        else => {
            @compileError("Unsupported type for parseT");
        },
    }
}
Add a test to check various combinations of types and values:
test "expect argument parsed as proper type" {
    try std.testing.expectEqual([2]i32{ 100, 200 }, parseArg(i32, "100x200", 'x'));
    try std.testing.expectEqual([2]f64{ -2.0, 0.5 }, parseArg(f64, "-2.0,0.5", ','));
    try std.testing.expectEqual(null, parseArg(f64, "x0.2", 'x'));
    try std.testing.expectEqual(null, parseArg(i32, "ab10,7c", ','));
    try std.testing.expectEqual(null, parseArg(i32, "7,", ','));
    try std.testing.expectEqual(null, parseArg(i32, ",7", ','));
    try std.testing.expectEqual(null, parseArg(i32, "", ','));
}
Run tests to verify everything works as expected:
$ zig build test --summary all
Build Summary: 3/3 steps succeeded
test cached
└─ run test cached
   └─ zig test Debug native cached 27ms MaxRSS:35M
To further enhance the functionality, implement a helper function to parse strings directly into complex numbers:
fn parseComplex(comptime T: type, str: []const u8) ?Complex(T) {
    const maybePair = parseArg(T, str, ',');

    if (maybePair) |pair| {
        return Complex(T){ .re = pair[0], .im = pair[1] };
    } else {
        return null;
    }
}

test "expect string is parsed into complex number" {
    try std.testing.expectEqual(Complex(f64){ .re = -2.0, .im = 0.5 },
        parseComplex(f64, "-2.0,0.5"));
    try std.testing.expectEqual(null, parseComplex(f64, "-2.0,"));
}
Great progress so far. You have everything ready to connect all the dots.
Putting it all together and running the program
With all the pieces in place, here’s the main function which, for given arguments, plots the Mandelbrot set and stores it into a PNG file.
pub fn main() !void {
    const allocator = std.heap.page_allocator;
    const args = try std.process.argsAlloc(allocator);
    defer std.process.argsFree(allocator, args);

    if (args.len != 5) {
        std.log.err("Usage: {s} [IMAGE_FILE] [IMAGE_RESOLUTION] [MANDELBROT_TOP_LEFT] [MANDELBROT_BOTTOM_RIGHT]\nExample: {s} mandelbrot.png 1000x750 -1.20,0.35 -1,0.20", .{ args[0], args[0] });
        std.process.exit(1);
    }

    const imgSize = if (parseArg(usize, args[2], 'x')) |s| s else {
        std.log.err("Failed to parse image resolution", .{});
        return;
    };
    const topLeft = if (parseComplex(f64, args[3])) |p| p else {
        std.log.err("Failed to parse top left point", .{});
        return;
    };
    const bottomRight = if (parseComplex(f64, args[4])) |p| p else {
        std.log.err("Failed to parse bottom right point", .{});
        return;
    };

    const pixels = try allocator.alloc(u8, imgSize[0] * imgSize[1]);
    defer allocator.free(pixels);

    render(pixels, imgSize, topLeft, bottomRight);
    try writeImage(args[1], pixels, imgSize);
}
The main function starts by allocating memory for command-line arguments and verifying the correct number of inputs. It displays usage information if the inputs are incorrect.
Next, it attempts to parse the image size and coordinates for the Mandelbrot set from the arguments, handling errors if parsing fails. If parsing is successful, it allocates a buffer for pixel data, calls the rendering function to generate the image, and then writes the image to a specified file.
Execute the following command to build, test, and run the program:
zig build test run --summary all \
  -- mandelbrot.png 1000x750 -1.20,0.35 -1,0.20
Upon successful execution, you should see:
Build Summary: 8/8 steps succeeded; 5/5 tests passed
test success
└─ run test 5 passed 206ms MaxRSS:1M
   └─ zig test Debug native success 1s MaxRSS:209M
run success
└─ run mandelbrot success 695ms MaxRSS:7M
   ├─ zig build-exe mandelbrot Debug native success 2s MaxRSS:336M
   └─ install success
      └─ install mandelbrot success
         └─ zig build-exe mandelbrot Debug native (reused)
A mandelbrot.png image is created in the project’s root folder. Note that the zig build command defaults to Debug mode, which does not apply optimizations.
To build an optimised executable you should go with either of these:
ReleaseSafeoptimizations on and safety on.ReleaseFastoptimizations on and safety off.ReleaseSmallSizeoptimizations on and safety off.
zig build -Doptimize=ReleaseFast --summary allNow let’s run the program with a higher image resolution and see how it performs. The following command measures the time it takes to compute and plot the Mandelbrot set for a larger image:
$ time ./zig-out/bin/mandelbrot mandelbrot.png 4000x3000 -1.20,0.35 -1,0.20
./zig-out/bin/mandelbrot mandelbrot.png 4000x3000 -1.20,0.35 -1,0.20
    3.85s user 0.01s system 99% cpu 3.871 total
You can see the computation took about four seconds, but as modern computers have multiple processor cores, performance could be significantly improved by utilizing concurrency. This presents a great opportunity to explore Zig’s concurrency features to enhance the program’s efficiency.
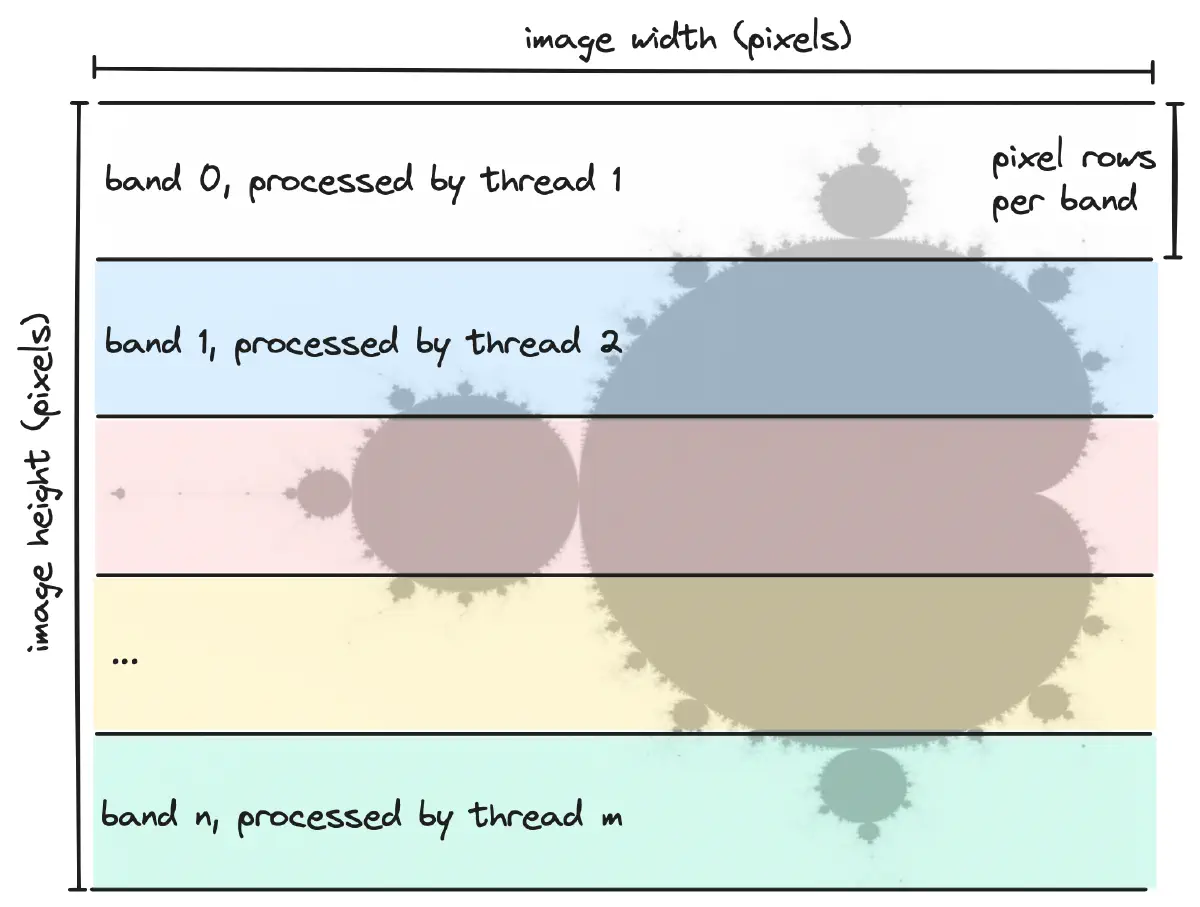
Speeding things up with concurrency
The goal is to leverage concurrency to speed up the rendering of the Mandelbrot set by dividing the image into sections that can be processed in parallel. For simplicity, you’ll split the image into horizontal bands, as shown in Figure 3.
Here’s the updated code which replaces this line render(pixels, imgSize, topLeft, bottomRight) with the following in the main function:
// render(pixels, imgSize, topLeft, bottomRight)

// Calculate the number of rows each thread should process based on CPU count.
const threadCount = try std.Thread.getCpuCount();
var threads = try allocator.alloc(std.Thread, threadCount);
defer allocator.free(threads);
const rowsPerBand = imgSize[1] / threadCount + 1;

// Create and start threads, each processing a segment of the image.
for (0..threadCount) |i| {
    // Determine the portion of the image array this thread will handle.
    const band = pixels[i * rowsPerBand * imgSize[0] .. @min((i + 1)
        * rowsPerBand * imgSize[0], pixels.len)];
    const top = i * rowsPerBand;
    const height = band.len / imgSize[0];
    const bandSize = .{ imgSize[0], height };

    const bandTopLeft = pixelToPoint(
        imgSize, .{ 0, top }, topLeft, bottomRight
    );
    const bandBottomRight = pixelToPoint(
        imgSize, .{ imgSize[0], top + height }, topLeft, bottomRight
    );

    // Spawn a new thread to process this part of the image.
    threads[i] = try std.Thread.spawn(
        .{}, render, .{ band, bandSize, bandTopLeft, bandBottomRight }
    );
}

// Ensure all threads complete their tasks.
for (threads) |thread| {
    thread.join();
}
This code snippet starts by determining how many CPU cores are available using std.Thread.getCpuCount() and allocates a corresponding number of threads. It then divides the image into horizontal bands, assigning each band to a different thread for processing.
Each thread runs a render function tailored to process just its assigned segment. After starting all threads, the main thread waits for each to finish by calling join() on them.
Build and run the program:
$ zig build -Doptimize=ReleaseFast --summary all
Build Summary: 3/3 steps succeeded
install success
└─ install mandelbrot success
   └─ zig build-exe mandelbrot ReleaseFast native success 7s MaxRSS:301M

$ time ./zig-out/bin/mandelbrot mandelbrot.png 4000x3000 -1.20,0.35 -1,0.20
./zig-out/bin/mandelbrot mandelbrot.png 4000x3000 -1.20,0.35 -1,0.20
    4.19s user 0.01s system 327% cpu 1.285 total
The provided timings show that the program now completes in about 1.3 seconds, which is a significant improvement. There are ways to optimise it even further, but I’ll leave it for you to explore.
The latest source code can be found in the mandelbrot GitHub repository .
Summary
Great job if you’ve reached this point! Here’s a recap of what you’ve briefly gone through:
- Installation process and dependency management
- Zig functions and structures
- Optional values, generics, and pattern matching
- Error handling and unit testing
- IO and concurrency
- Building and running the final executable
To solidify the knowledge you’ve gained from the Mandelbrot set exercise, I recommend exploring the official Zig guide next. Try to tweak and enhance the Mandelbrot program even further.
Speaking of Zig, did you know there’s a fun backstory to how it got its name? This Python script was created to randomly generate four-letter words starting with ‘Z’ followed by a vowel. Although the intention was to pick a four-letter word, the three-letter word “Zig” ended up catching everyone’s attention and was ultimately chosen.